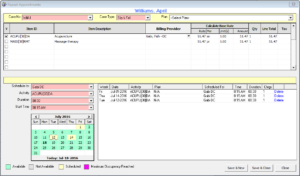
The Appointment Book is designated for scheduling and managing patient appointments. The system provides detailed information on the scheduled appointment itself. This information includes patient and provider names, scheduled activity, and appointment status.
You can schedule appointments:
- on the fly, without adding charges (charges can be added later)
- with a precharge
- in a series of repeat appointments
To perform the following procedures, open the Appointment Book.
Schedule an Appointment on the Fly
- Select a date from the calendar on the right side of the screen.
- Under the Patient section, enter the first few characters of patient’s Last Name, then press Enter.
Tip: To search patients by First Name, Phone, or Case No, click the drop-down arrow next to the [Search] button and select the desired criteria. - Select the Patient.
Tip: You may also schedule appointments for new patients, on the fly, using the [New Patient] button. You will want to re-open the Patient Record later to complete the intake for that patient. - From the Activity section, select a Service to schedule.
- Double-click on an available time slot under a Provider who can perform the selected Activity.
Note: To overlap this appointment with another, double-click on a time slot that already contains an appointment, or right click on a scheduled appointment and choose Overlap Appointment.
Warning: The system will only allow overlaps until it reaches Maximum Occupancy for the Provider.
Schedule an Appointment with Precharge
This feature allows charges to be added at the time of scheduling an appointment. However, the charges will actually be applied when the patient is checked-in for that appointment.
- Click [New Appointment & Precharge] on the toolbar.
The New Appointment & Precharge window opens.

- Select the Patient name from the drop-down list.
Tip: To move through the list quicker, start typing the patient’s Last Name.
Note: The Patient Note section shows any notes associated with the selected patient. - Select a Case No and a Charge type (if other than the default).
Note: You may also want to choose a treatment plan to which the visit applies. The charges applied to that plan for the selected date are listed in the table portion of the screen, which shows the remaining quantity for each service in the plan. The plan subtotal and total are shown in the bottom right corner. - Select the Appointment date (defaults to current date).
- Select which Scheduled provider and Scheduled activity is involved in the appointment.
Note: The providers list contains only providers scheduled to work on that date; the activity list contains only activities performed by that provider. - Select the Duration of the appointment (defaults to the time associated with the selected activity), and the appointment Start time (the list contains only times at which the scheduled provider is available).
- If necessary, change the appointment’s default status (“Unconfirmed”).
- Enter any applicable Appointment notes.
- Add charges using one of the following options:
- If you selected a treatment plan, check the box for each service in that plan that will be provided during this appointment.
Tip: You may change the charge values (e.g. rate or unit) for this specific appointment. You can also add additional services for this specific appointment, as described below. - If you did not select a treatment plan, check the box for each service to be provided during this appointment.
Note: As you check services, the subtotal and total for the appointment are automatically calculated and displayed on the bottom right of the items table.
- If you selected a treatment plan, check the box for each service in that plan that will be provided during this appointment.
- Click Save & Close.

Schedule Repeat Appointments with Precharge
Using the Repeat Appointments function allows you to Schedule and Precharge multiple appointments faster. Once the patient is checked-in, the charge will be applied automatically.
- Click [Repeat Appointments] on the toolbar.
- Select a Patient from the drop-down list and click Add Appointments.
The Repeat Appointments window opens.
- Select the Case No and Case Type for the appointments.
- Add charges using one of the following options:
- If you selected a treatment plan, check the box for each service in that plan that will be provided during the appointments.
Tip: You may change the charge values (e.g. rate or unit). You can also add additional services, as described below. - If you did not select a treatment plan, check the box for each service to be provided during these appointments
- If you selected a treatment plan, check the box for each service in that plan that will be provided during the appointments.
- Select the Provider from the Schedule for drop-down list.
The calendar shows the availability of the selected Provider. - Select the Activity, Duration, and Start Time of the appointment.
- Double-click on a calendar date to create an appointment.
- Repeat steps 4-7 to schedule additional appointments.
Note: To delete an appointment, select it and click the Delete link. - When all appointments are scheduled, click Save & Close, then click Close.

Move an Appointment
There are two ways to move an Appointment:
Select and Drag
- Select and drag an appointment from one time slot to another.
Tip: From the Weekly Schedule tab you may drag appointments between days.
Cut and Paste
- Right-click an appointment you want to move, then select Cut Appointment.
- Click Yes when prompted.
- Change calendar date, then paste the appointment into an available time slot.
Note: You may not move appointments with Checked-In or Missed status.
Delete an Appointment
Note: You are required to enter user password and have appropriate permissions in order to delete appointments.
- Right-click on an appointment and select Delete Appointment.
Tip: Alternatively, select an appointment, then click [Delete Appointment] on the toolbar. - Click Yes when prompted.
Delete Repeat Appointments
Note: You are required to enter user password and have appropriate permissions in order to delete appointments.
- Click [Repeat Appointments] on the toolbar.
- Select a patient from the list and locate the Appointment Batch to be deleted.
- Select the Batch, then click Delete.
- Note: You may want to expand the Batch to delete individual Appointments rather than the whole Batch of the Repeat Appointments.
- Click Yes when prompted.