This article helps you manipulate appointments in the Appointment Book.
To perform the following procedures, open the Appointment Book.
Extend and Shorten Appointment Duration
- Click on an Appointment, then hover the mouse cursor over the bottom of the Appointment Cell, until the cursor changes to show a two headed arrow.
- Click and drag the cursor Down to extend, or Up to shorten, the appointment time duration.
Move an Appointment
There are two ways to move an Appointment:
Select and Drag
- Select and drag the Appointment to move it from one time slot to another.
Tip: From the Weekly Schedule tab you may drag appointments between days.
Cut and Paste
- Right-click the Appointment you want to move and select Cut Appointment.
- Click Yes when prompted.
- Paste the appointment into an available time slot.
Note: You may not move appointments with Checked-In or Missed status.
Search Appointments
- Click [Find Appointment] on the toolbar or press Ctrl+F.
The Appointment Search window opens.
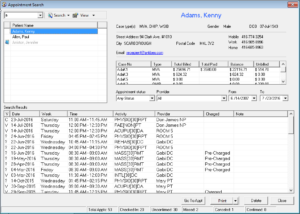
- In the Search box (top-left corner of the window), type a few letters of the patient’s last name, then click Search or press Enter.
Tip: To search patients by any other criteria, click the arrow next to the Search button and select the desired search method. Clear the Search box, then press enter to return to list all active patients. - Select a patient from the search results.
The Search Results are populated with patient information as well as with the existing appointments. You can filter the appointment list by Appointment status, Provider, or Date. - Select a Search Result and click the Go To Appt button to view the appointment.

Note: You can print the search results for a patient by clicking Print. This is typically used to print the patient’s schedule of future appointments (select Unconfirmed from the Appointment status list before printing).
Show and Hide Appointment Tooltip
The Appointment Tooltip displays the patient’s name and appointment activity when you hover your mouse pointer over an existing appointment. This can be very useful when a workday is heavily populated with appointments. You can enable or disable the tooltip.
- Go to Edit > Preferences.
- Select Appointment Book Settings from a list on the left.
- On the right, check the box beside Show Tooltip.
- Click Save Changes, then click Close.
Note: After you make changes in system preferences, you may want to refresh the Appointment Book by changing the calendar date back and forth.
Show and Hide Red Timeline
The dynamic Red Timeline visually shows the current time of day on the daily or weekly schedule in the Appointment Book. This lets you quickly see current and upcoming appointments for all providers. You can enable or disable the Red Timeline.
- Go to Edit > Preferences.
- Select Appointment Book Settings from a list on the left.
- On the right, check the box beside Show Red Line.
- Click Save Changes, then click Close.
Note: After you make changes in system preferences, you may want to refresh the Appointment Book by changing the calendar date back and forth.
Delete an Appointment
Note: You are required to enter user password and have appropriate permissions in order to delete appointments
- Right-click on an appointment, then select Delete Appointment.
Tip: Alternatively, select an Appointment, then click [Delete Appointment] on the toolbar. - Click Yes when prompted.
Delete Repeat Appointments
Note: You are required to enter user password and have appropriate permissions in order to delete appointments.
- Click [Repeat Appointments] on the toolbar.
- Select a patient from the list, then locate and select an Appointment Batch.
- Click Delete.
Note: You may want to expand the batch to delete individual appointments rather than the whole batch with Repeat Appointments. - Click Yes when prompted.