This article will help you add and manage the Activities (services) that may be performed by providers in your facility.
To perform the following procedures, open the Activity Manager.
Add Activity
- Click [New Activity] on the toolbar.
- Ensure the Status is set to Active.
- Enter a unique Activity ID to be used to reference the Activity throughout your facility. Use a short, descriptive ID that will make it easy to find this Activity (service) when working with patient files and invoices.
Note: An Activity ID cannot be changed once it has been saved. - Choose the appropriate Activity Type.
- Enter an Activity Description. This will appear in charges and invoices for the Activity.
- Leave Required Resource at its default value (Provider).
- Double-click each Fee Schedule that applies to the Activity.
The Rate Details window opens.
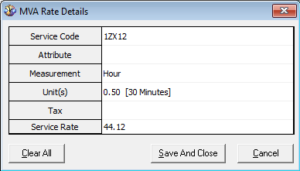
- Complete the fields, then click Save & Close.
Note: For EHC, MVA, WSIB, and OHIP case types a service code must be selected. If the service code (such as CCI code or GAP code) is not listed in the drop-down, see the Add and Manage Service Codes article to learn how to add it. - Set the Default Duration of time for an appointment that involves this Activity, and the Color to be used to represent the Activity in the Appointment Book.
- Click [Save Activity] on the toolbar.

Search for Activity
In the search box above the list of activities, enter the first few characters of the Activity ID, then click Search or press Enter.
The list changes to show just activities that start with those characters.
Note: To restore the full list, clear the field and click Search or press Enter again.
Tip: To search based on activity description, click the arrow next to Search and choose Description.
Deactivate or Reactivate Activity
Notes:
- Deactivated activities cannot be charged for or added to invoices.
- By default, only active activities are listed. To view both active and inactive activities, click the View arrow (above the list of activities on the left of the screen) and choose All.
- Select an activity from the list on the left.
- Click [Edit Activity] on the toolbar.
- Change the Status to Active or Inactive.
- Click [Save Activity] on the toolbar.
Edit Activity
- Select an Activity from the list on the left.
- Click [Edit Activity] on the toolbar.
- Make changes to the activity details.
Note: The Activity ID cannot be modified. - Click [Save Activity] on the toolbar.
Delete Activity
Note: An activity cannot be deleted if it has been used in a scheduled appointment.
- Select an Activity from the list on the left.
- Click [Delete Activity] on the toolbar.
- Click Yes when prompted.