Note: Terms “Resource” and “Provider” will be used interchangeably in this article.
This article is intended to help you add providers and show you how to assign them to departments. The Provider Schedule and Activities Performed tabs are described in separate articles.
Note: Be sure you have created a Staff Member record for the provider before proceeding. For more information see Create and Manage Staff Members.
To perform the following procedures, open the Resource Manager.
Add a Provider
- From the Resource Details tab, click [New Resource] on the toolbar.
- Ensure the provider’s Status is set to Active.
- Leave the Resource Type at its default (Provider).
- Enter the unique Resource ID assigned to the provider by your facility.
Note: The Resource ID cannot be changed. - Enter the Resource Name. This appears on the column heading of the Appointment Book.
- In Max Occupancy, specify the maximum number of simultaneous appointments for which this provider can be booked (e.g., a physio may serve five patients at the same time, but a massage therapist only one).
- Choose the Staff Member record that corresponds to this resource.
- The Service Type field is populated with the occupation recorded for the selected staff member. This information appears in OCF-21 (Private) invoice layouts: for EHC invoice layouts the information is combined with the list of activities performed by the staff member.
- Choose the HCAI Provider for the provider. The list of providers is based on your HCAI portal and drawn directly from HCAI. The HCAI Reg Number, as assigned and used by HCAI to recognize this provider, is automatically inserted.
Tip: Optionally, Check the Column Width box, then enter a new value to change the column width in the Appointment Book. This is particularly useful for providers who see multiple patients during the same hour. - Assign one or more college registration numbers, click inside the empty College Registration boxes, then enter the appropriate information.
- Enter the number assigned to the provider by the MOH (Practitioner No), the code that identifies the provider’s medical specialty (OHIP Specialty Code), and the local district code to which the provider is assigned (OHIP District Code).
- Click [Save Resource] on the toolbar.
Assign a Provider to a Department
You can assign providers to specific departments to sub-divide your clinic’s schedule in the Appointment Book.
Note: For more information about Departments see Add and Manage Departments article.
- Select a resource on your left.
- Click the Department(s) tab.
- Click [Assign Department(s)] on the toolbar.
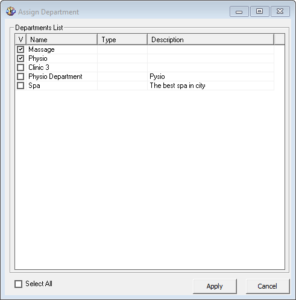
The Assign Departments window opens.

- Check the box beside the department(s) you want to assign to a resource.
- Click Apply.
Search for Provider
- In the search box above the list of providers, enter the first few characters of the provider’s resource ID.
- Click Search or press Enter.
The list changes to show just those resources whose resource IDs begin with those characters.
To restore the full list, clear the field and click Search or press Enter again.
Tip: To search based on the resource’s name, click the arrow next to Search and choose Name.
Deactivate or Reactivate Provider
Notes:
- By default, only active providers are listed. To view both active and inactive providers, click the arrow next to View (above the list of providers on the left of the screen) and choose All.
- Deactivated providers cannot be referenced on claim forms and invoices created after they are deactivated, but their schedules remain active.
- Select a provider from the list on the left of the screen.
- Click [Edit Resource] on the toolbar.
- Change the provider’s Status to Active or Inactive.
- Click [Save Resource] on the toolbar.
Edit Provider
- Select a provider from the list on the left.
- Click [Edit Resource] on the toolbar.
- Make changes to the provider details.
Note: The provider’s Resource ID cannot be changed. - Click [Save Resource] on the toolbar.
Delete Provider
Note: A provider with scheduled appointments cannot be deleted.
- Select a provider from the list on the left.
- Click [Delete Resource] on the toolbar.
- Click Yes when prompted.