This article will help you create and manage WSIB invoices.
There are two ways to create and manage WSIB invoices and they vary based on whether or not a Treatment Plan is used to track patient visits.
Tip: A treatment plan helps to track down patient visits and provide with reassessment reminders. For more information, see the Manage Built-In Alerts article.
To perform the following procedures, open the Patient Manager and select a patient with WSIB case type. Then open the patient case and select the Account Activity tab. By default, the Invoices & Payments tab opens in the Account Activity.
WSIB Template Types:
Create an Invoice Without Treatment Plan
- Click the arrow next to [New Invoice/Payment/Refund] on the toolbar, then select New Invoice.
- From the Template type drop-down list, choose a WSIB template and click Open.
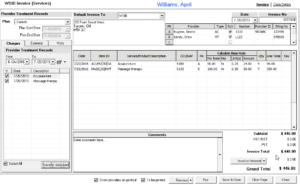
The WSIB Invoice editor opens.

Note: Be sure to select the Block Code when creating WSIB-POC invoices. - Add billing items using one of the following options:
- In the Charges tab, check the charges you want to include in the invoice or check the Select All box, then click Transfer Selection. To filter the list, select a date range using the From and To dates. All unbilled charges are listed for the selected duration.
- In the Calendar tab, select the Provider and Activity, then double-click on the calendar date to add a billing item (e.g., in case you don’t use Appointment Book or forgot to add a charge).
- In the Visits tab, select the Activity, then check the box beside the existing scheduled appointment dates or check the Select All box and click Transfer Selection. To filter the list, select a date range using the From and To dates.
Tip: You can filter the list of appointments by status; click the arrow button next to the date ranges. - Click inside an empty cell under the Item ID column and select the billing item from the drop-down list.
Note: You must associate a valid provider to each billing item. In the Provider Reference table on top-right, click inside an empty cell under the Provider column and select one from the drop-down list. Then, under the PR column in the Billing Items table, reference the provider by choosing the respective letter.
- Complete any optional details as follows:
- To add a message to an invoice, type in the Comments box
- To make changes to claimant information, click Claim Details on top-right
- To add this invoice to the Invoices to Print reminder list, check the To be printed box
- To show or hide the provider college registration on printout, check or clear the Show providers on printout box
- Click Save & Close.
Tip: To change details displayed on preview, use the arrow next to Preview.
Create an Invoice by Treatment Plan
- Click the arrow next to [New Invoice/Payment/Refund] on the toolbar, then select New Invoice.
- From the Template type drop-down list, choose a WSIB template and click Open.
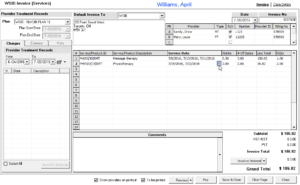
The WSIB Invoice editor opens.

Note: Be sure to select the Block Code when creating WSIB-POC invoices. - Select a treatment plan from the Plan drop-down list and click Yes when prompted.
- Add billing items using one of the following options:
- In the Charges tab, check the charges you want to include in the invoice or check the Select All box. Click Transfer Selection. To filter the list, select a date range using the From and To dates. All unbilled charges are listed for the selected duration.
Tip: From the Charges tab you can filter by Plan or All charges by clicking the arrow button next to the date ranges. - To add charges by date or visit, double-click the “…” in the column between Service Date and RUnits (see screenshot). Select a service from the Service/Product drop-down list, then double-click on a date, or match it with existing appointment and click Transfer Selection.
Tip: You can filter the list of appointments by status; click the arrow button next to the date ranges.
Note: In the Proposed/Approved Summary table you can see the remaining quantity (RQty) change as you double click on the calendar.
- In the Charges tab, check the charges you want to include in the invoice or check the Select All box. Click Transfer Selection. To filter the list, select a date range using the From and To dates. All unbilled charges are listed for the selected duration.
- Follow steps 4-5 in the Create an Invoice Without Treatment Plan heading above.
Change Invoice Status
In Universal Office, a status reflects the current state of a document. Right-click on an invoice, select Invoice Status and choose Created or Sent.
Edit Invoice
Note: You may edit WSIB invoices in Created status only.
- Double-click on a WSIB invoice (or select one and click [Edit Invoice] on the toolbar.
- Make changes, then click Save & Close.
Delete Invoice
Notes: You are required to enter user password and have appropriate permissions in order to delete the invoice. Also, you can only delete an invoice that has not yet been sent.
- Select a WSIB invoice.
- Click [Delete] on the toolbar.
- Click Yes when prompted.