This article will help you add and manage patient case charges. A charge is what you bill a client for when you provide a product or service. It may be the result of a patient visit, delivery of a product (assistive device), or planning, brokerage, preparation, or administrative services that may occur without seeing the patient.
In Universal Office, you can add an independent charge or connect one to a treatment plan. Adding charges to a treatment plan means that you always know how many visits are remaining until the treatment plan is exhausted (countdown to reassessment).
Use this procedure when adding charges for all case types, including MVA, EHC, WSIB, Private, Slip & Fall, and OHIP. Please note, that the charge details may vary from one case type to another.
Add a Charge from a Patient Case
- In a patient case, from the Account Activity tab select Charges.
- Click [New Charge] on the toolbar.
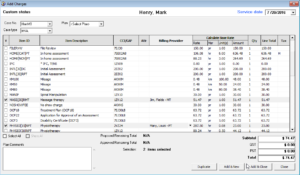
The Add Charges window opens.

Tip: To countdown to reassessment, you will want to associate each charge to an active treatment plan. You can do so by simply selecting a plan from the Plan drop-down list. - Click on an empty row in the Item ID column and select the desired service/product.
Tip: Alternatively you may choose to have all available products and services displayed. This allows you to simply check the box beside the Item ID. See the Modify Charge List Preferences heading below. - For each product/service selected, chose a valid Billing Provider.
Tip: Alternatively, you may choose to duplicate charges from a predefined preset or from one of the charges previously added to the patient case.
Note: The amount of the total charge is shown in the fields in the bottom right corner of the screen. If you selected a plan, the proposed and approved Remaining Total values are adjusted to reflect the charges. - Click Add & Close.
Add a Charge from an Appointment
- Open the Appointment Book.
- Double-click on a checked-in appointment.
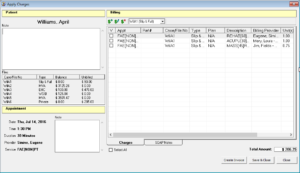
The Apply Charges window opens.

- From the list in the Billing section, select a case (if not already selected).
- Click [New Charge] on the toolbar.
- Follow steps 3-4 in the Add a Charge from a Patient Case heading above.
- Click Save and Close.
Modify Charge List Preferences
Note: This preference will be reflected system wide.
- Above the main toolbar Click Edit > Preferences.
- From the list on the left, select Billing Settings.
- Check the box beside the List all charges by default to have the system list activities/products, or clear the box to display a blank list allowing you to select services from the list.
- Click Save Changes, then click Close.
Duplicate from Previous Charges
This feature allows you to duplicate charges from a previous date.
- From the Add Charges window (accessed from an appointment or the patient case), click Duplicate.
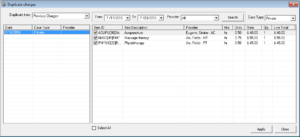
The Duplicate charges window opens.

- Make sure that Previous Charges is selected in the Duplicate from drop-down list.
- In the left pane, select to highlight the date from which you want charges to be duplicated.
Charges are shown in the right pane: if necessary, you can clear the checkbox for a charge to not duplicate it. - Click Apply.
Tip: To help you locate charges faster, you can filter the charges list by provider and date range. Use the filter options located above the items list.
Duplicate from a Preset
This feature allows you to duplicate charges from a predefined preset.
- From the Add Charges window (accessed from an appointment or the patient case), click Duplicate.
- Select Preset Charges in the Duplicate from drop-down list.
- In the left pane, select a precharge.
Tip: The charges included in the selected preset are displayed in list on the right pane. You have the option to selectively choose charges to add from the preset or select all. - Click Apply.
Tip: To help you locate charges faster, you can filter the charges list by case type. Use the filter options located above the items list.
Edit Charge from a Patient Case
Note: You may edit only those charges that have not yet been invoiced.
- In a patient case, on the Account Activity tab select Charges.
- Double-click on a charge (or select to highlight one, then click [Edit Charge] on the toolbar).
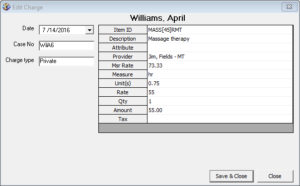
The Edit Charge window opens.

- Make changes to charge description, service code (if applicable), provider, measure rate, units, rate, quantity, and tax. You can also connect or disconnect the charge from a plan by choosing from the By Plan drop-down list.
- Click Save & Close.
Edit Charge from the Appointment Book
Note: You may edit only those charges that have not yet been invoiced.
- Double-click on a checked-in appointment that contains a charge.
- Double-click on a charge (or select to highlight one, then click [Edit Charge] on the toolbar).
The Edit Charge window opens.

- Make changes to charge description, service code, provider, measure rate, units, rate, quantity, and tax.
- Click Save & Close in the Edit Charge window.
- Click Save & Close in the Apply Charges window.
Delete Charge from the Appointment Book
Note: You may delete only those charges that have not yet been invoiced.
- Double-click on a checked-in appointment that contains a charge.
- Check the box next to one or more charges, then click [Delete Charge] on the toolbar.
- Click Yes when prompted.
- Click Save & Close in the Apply Charges window.
Delete Charge from a Patient Case
Note: You may delete only those charges that have not yet been invoiced.
- In a patient case, on the Account Activity tab click on Charges.
- Check the box next to one or more charges, then click [Delete Charge] on the toolbar.
- Click Yes when prompted.
Preview and Print Statement of Charges
- In a patient case, on the Account Activity tab click on Charges.
- Check the box next to one or more charges or check the Select All box on the bottom left.
- Click [Print Preview] on the toolbar.
The statement of charges is shown. You may export the document to PDF or print it.
Customize Columns of Charges Tab
- In a patient case, on the Account Activity tab click on Charges.
- Click [Customize Columns] on the toolbar.
The Customize Columns window opens.

- Select a Case Type.
- Check the box for each Field Name to be displayed.
- Double-click on the current Field Width and change as necessary.
- Change the field order using Move Up and Move Down.
- Click Save & Close.
Note: Columns should be customized for each case type individually.
Filter Charges List
You have the option to filter the charges list shown on the Charges tab of the patient case. Simply select a date range using the From and To dates. The system filters the list immediately after you change the dates.